Countershaft Sprocket (Pinion Wheel) Installation
Removal and installation of the countershaft sprocket is fairly straightforward with one noted exception.
Parts needed:
Stake Washer: 800081451
New Sprocket part varies by bike/year but note 2000/2001 bikes utilize a different sprocket offset than that of Senna/2002 and later bikes!
MY 2000-2001 Sprocket/Pinion Wheel:
800088340 =14 (standard)
8A0088340 =15
8B0088340 =16
MY Senna/2002/2003:
800098034 = 15 (standard)
There are two methods of removal. One (1) involves using the transmission in gear as force against which to remove the sprocket nut while the other (2) involves using the wheel and tire being bound as force against which to remove the sprocket nut.
REMOVAL PROCEDURE Alternative 1 (of 2):
-Put bike in gear
-Remove the chain from the bike
*Note loosen swingarm pinch bolts then utilize hub eccentric to loosen/slacken chain first
-Proceed to Procedure for sprocket cover and sprocket removal, below.
REMOVAL PROCEDURE Alternative 2 (of 2)
-Chock or tie rear wheel. You can accomplish this by tying the rim to your work stand or using the tire's friction against the work surface. Please note however that the loosening motion of the sprocket nut (left or counter/anti-clockwise will drive the wheel forwards and potentially off of the bike's sidestand.
-Remove the chain from the bike
*Note loosen swingarm pinch bolts then utilize hub eccentric to loosen/slacken chain first
Procedure for sprocket cover and sprocket removal:
-Remove the following 4 bolts (but not yet the cover itself)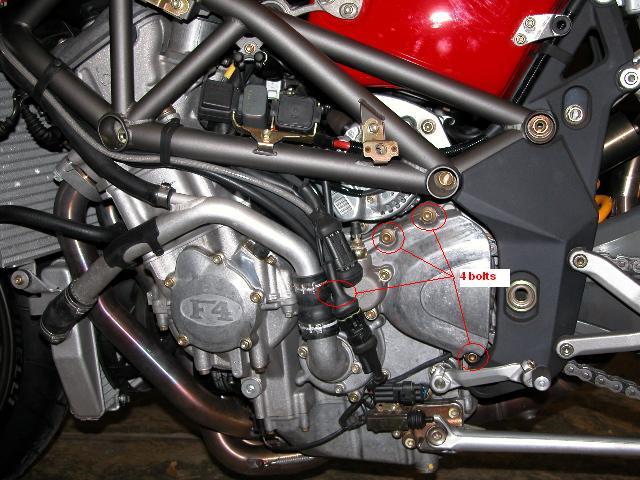
Notice that three of these bolts are on the cover itself (10mm) and one is the left side of the clutch slave sylinder (8mm).
-Removal of the black speed sensor plug (AMP connection) may aid in clearing space.
IMPORTANT NOTE: This is the main gotcha for the procedure.
-To remove the counter shaft sprocket cover once the bolts are removed first slide the cover out just enough to get your fingers behind the cover. Behind the Clutch Slave Cylinder is the clutch actuation rod - as pictured below. This MUST remain inserted into the case and not be pulled out with the cover. I find it easiest to pull the cover just barely away then hold the rod with two fingers while sliding the cover off. It can be balky so be patient, it may take some slight rocking to help dislodge the rod from the cover. If you use needle nose pliers to help hold the rod in the case then cover with protective tape to keep from scoring the rod with the pliers.
-Once the cover is removed tie or tape it up to the frame so as to relieve pressure from the hydraulic line fitting.
Now the sprocket is revealed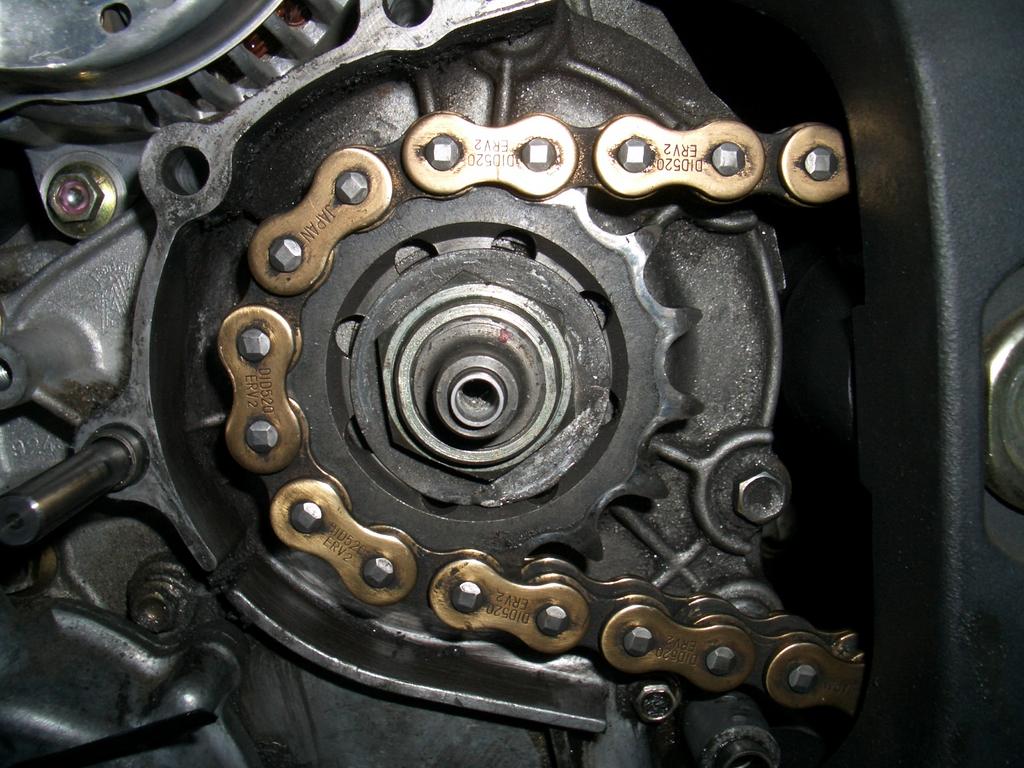
Notice the clutch actuation rod (protruding) to the left of the sprocket. The stake washer as shown has also been bent back flat from it's locking position against the side of the nut. Yours should still be flush with one side of the nut.
-I prefer to remove the speed sensor wheel from the centre of the counter shaft, shown removed above (8mm?)
-Flatten stake washer to allow full access to all sides of nut
-Remove countershaft nut with 32mm or 1-1/4" socket. I found that a deep well socket was not needed if you remove the speed sensor wheel first. Standard threading so left or anti/counter-clockwise to loosen. Note any offset present on sprocket (Senna & 2002 onward) and remove stake washer then sprocket itself.
*This is a good chance to clean inside countershaft sprocket cover, speed sensor, chain guides, etc of any chain lube and grime
-Install new sprocket with offset, if present, on the engine case side (not facing you). Clean grooves in the shaft to aid installation, gentle tapping may be required to seat fully.
-Install new stake washer noting grooves in counter shaft
-Tighten counter shaft sprocket nut. Normal threading - tighten to the right or clockwise. 100Nm / 74lb ft.
-Bend portion of stake washer so that it sits flush with one entire side of the nut. A flat punch and small hammer will assist in full contact with the nut.
-Install new chain.
-Slide the cover back onto the clutch actuation rod and seat it firmly into the locating dowels. Take note to place the speed sensor wiring into the slot at bottom before continuing.
-Tighten the three 10mm cover bolts to 25Nm or 18lb/ft
-Tighten the clutch slave cylinder bolt to 8Nm or 6 lb/ft
-Reattach the black speed sensor connection
-JamesC
posted by MV FAQ @ 10:48 AM
1 Comments
![]()

1 Comments:
Can you tell me why removing the clutch rod from the engine sprocket side is so bad ??
If you have done this what problems arise ??
Post a Comment
Subscribe to Post Comments [Atom]
<< Home