Rear Brake reservoir relocation & resolving poor performance
Although the usefulness of the rear brake is debated time and again this article only hopes to explain a few ways to improve its performance should you so choose.
There are several possibilities for improvement, from fairly simple to fairly involved. We will start with the simple methods and move to the more involved, some owners stop at the simplest method while others move to the most complicated - your results may vary depending on how you use the rear brake.
Section #1 - easy bleeding of rear brake
Section #2 - adds the complete bleeding process to above
Section #3 - relocation of rear brake reservoir
First, high quality brake fluid should be used in all of the below scenarios. You are interested in the specification level of fluid, the dry boiling point and the wet boiling point.
Here is a very good write-up by a well respected automotive engineering expert, Carrol Shelby, on brake fluid properties:
http://www.stoptech.com/tech_info/wp_brakefluid_1a.shtml
The two most popular fluids are Motul RBF 600 and Castrol SRF. Motul is much easier to find and about 25% the cost of Castrol SRF yet is not quite at the level of SRF, as the article explained in detail. Most automotive and motorcycle shops carry in stock or have access to Motul RBF600. Specialty race shops, most likely automotive, will need to be contacted for Castrol SRF purchase.
Motul RBF600 data sheet:
http://www.motul.com/motulbaseuk/gab_fiche2b.asp
Castrol SRF data sheet:
http://www.castrol.com/liveassets/bp_internet/castrol/castrol_usa/STAGING/local_assets/downloads/c/ccc.pdf

The simplest method of resolution is to simply bleed your rear brake. There is an easy way and a more complete way to do this:
*Note, brake fluid is extremely damaging to finishes. Protect all surfaces from fluid!
Parts needed:
Brake fluid
Clear hose (like that for aquarium which fits over rear caliper nipple. ~6mm or 1/4")
Container for old brake fluid drain
#1 Easiest
-Remove lower V fairing
-Remove right side fairing
-*Remove rear wheel *note reverse threaded 55mm wheel nut at 220-240Nm
-Remove rear brake reservoir from behind right side frame plate *(2) 8mm bolts and note hose routing for reassembly
-Relocate reservoir to engine side cover for easy access, tie to footpeg or dzus plate keeping level -Remove black Rear Caliper nipple cover and attach clear hose which drains into container
-Carefully remove reservoir top with two cross-head/philips screws
-Carefully remove rubber diaphragm from inside reservoir. Note the shape of the diaphragm for reassembly, it is shaped to take up space in the reservoir
-Remove almost all old fluid before adding new. Leave barely just enough at the bottom so no air is sucked into the system before adding new fluid
-Fill fluid to 1/4 - 1/2 of the reservoir
-Pump rear brake pedal 3+ times to build up pressure in system, hold pedal down at last stroke to keep pressure in system
-Using combination wrench (8mm) slightly open the rear caliper bleed nipple allowing fluid to escape into discard container while continuing to apply pressure to brake pedal. Close bleed nipple as soon as fluid stops moving and then you can release brake pedal

-Pump rear brake pedal 3+ times and continue the two steps above, alternating building up pressure and releasing the old fluid into the discard container
Reassembly:
-Tighten fully then remove combination wrench from rear caliper bleed nipple
-Remove fluid hose and replace bleed nipple cover
-Clean off rubber reservoir diaphragm and reshape
-Add or remove fluid so that there is approx 1/4-1/3 fluid filling the reservoir
-Insert diaphragm paying careful attention to brake fluid level, you want the fluid to reach the fill line of the reservoir when diaphragm is completely inserted
-Screw cover closed on reservoir
*suggest pumping brake pedal testing caliper bleed nipple and reservoir cover for leaks
-Rebolt reservoir behind right side frame plate paying close attention to hose routing
-Reattach rear wheel noting reverse threaded 55mm wheel nut, torque to 220-240Nm
*Note, pay close attention to the reservoir during this work never allowing it to empty! If it sucks air into the system you will have to work to remove all air from hoses/caliper all over again! Much like a bathtub drain the vacuum can suck air into the system even when there is a small amount of fluid at the bottom - beware.
Once all air is removed and you are sure it is only new fluid in the system you are done with this easiest method, suggest you at least read over next hardest method, complete bleeding, for further understanding should this process alone not entirely fix the rear brake.
#2 Complete Bleeding
-Remove lower V fairing
-Remove right side fairing
-Remove rear wheel *note reverse threaded wheel nut at 220-240Nm
-Remove rear brake reservoir from behind right side frame plate *(2) 8mm bolts
-Relocate reservoir to engine side cover for easy access, tie to footpeg or dzus plate keeping level
-Remove black Rear Caliper nipple cover and attach clear hose which drains into container -Carefully remove reservoir top with two cross-head/philips screws
-Carefully remove rubber diaphragm from inside reservoir. Note the shape of the diaphragm for reassembly, it is shaped to take up space in the reservoir
-Remove almost all old fluid before adding new. Leave barely just enough at the bottom so no air is sucked into the system before adding new fluid
-Fill fluid to 1/4 - 1/2 of the reservoir
-Remove the rear brake pads
* Optional - Free rear caliper brake line from swingarm to allow a bit of slack
-Remove the two bolts attaching caliper to swingarm mount
-Position the rear brake caliper so that the bleed nipple is the highest point on the assembly, this allows any air bubbles to rise to the top during the bleeding process
*Optional - reinstall rear brake pads to act as spacers and thus keep caliper pistons from hyperextending during bleeding process
-Pump rear brake pedal 3+ times to build up pressure in system, hold pedal down at last stroke to keep pressure in system
-Using combination wrench *8mm slightly open the rear caliper bleed nipple allowing fluid to escape into discard container while continuing to apply pressure to brake pedal. Close bleed nipple as soon as fluid stops moving and then you can release brake pedal
-Pump rear brake pedal 3+ times and continue the two steps above, alternating building up pressure and releasing the old fluid into the discard container
*Optional step, once you are sure all old fluid has been evacuated you can then run your bleed nipple extraction hose back into the reservoir. This cycles the new fluid through the caliper and hoses thus extracting the air bubles but without wasting good new fluid
#3 Relocation of Rear Brake Reservoir
Parts needed:
Length of brake hose, 1m / 3ft (? Inner Diameter)
Small piece of alu or metal to serve as a bracket
*Optional, two new hose clamps fro brake hose
Starting in 2003, F4 750 models were fitted with a relocated rear brake reservoir to help keep it away from residual exhaust heat. Some owners have made a modification to mimic this. The Brutale and 1000cc models also had their reservoir relocated to reside behind the right side frame plate and under the gas/petrol tank.
-Remove lower v-cowl fairing
-Remove right side fairing
-Remove rear wheel, 55mm reverse threaded 220-240Nm
-Remove (2) 8mm bolts to free the rear brake reservoir from behind the right side frame plate
-Remove (2) cross-head/philips screws on reservoir cap and empty fluid
-Remove hose from bottom of reservoir
-Remove hose from rear brake master cylinder
-Remove upper exhaust mount bolt
Approximate the size needed for a small custom bracket, this will affix the rear brake reservoir to the upper exhaust mount as follows

Photo courtesy John King
It is likely you will have enough bolt length on the original bolt but if you choose a large width bracket you may need to extend your exhaust mount bolt by the corresponding amount. A simple bolt, nut and lock washer will affix the reservoir to the new bracket.
-Route your new brake line, without yet affixing to reservoir or master cylinder, from the general location of each, down subframe, behind frame plate and around to the master cylinder
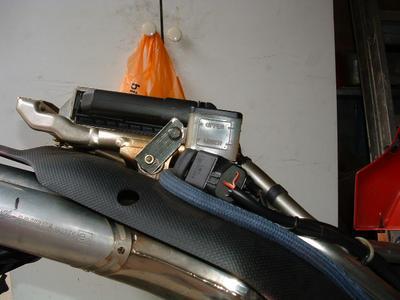
Photo courtesy John King
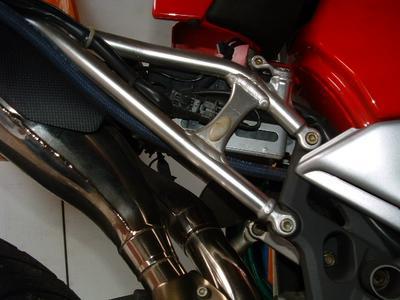
Photo courtesy John King
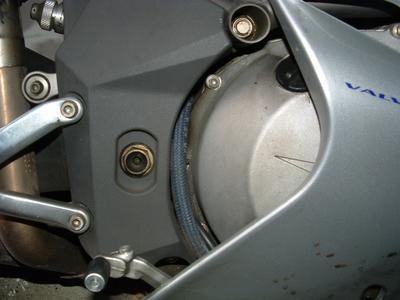
Photo courtesy John King

Photo courtesy John King
Some owners have also protected their brake line with heat resistant shielding such as that manufactured by thermotec:
http://www.thermotec.com/products/full/14005/14005.html
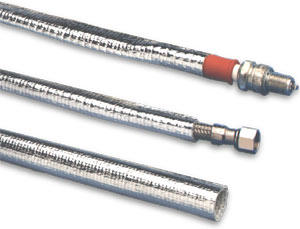
These sleeves will need to be added before you affix your new brake line to either side.
-Affix new line to each side of the system, reservoir and rear brake master cylinder - double check hose clamps on both ends
-Proceed to bleed the rear brake system as seen in section #1 or #2 above
-Reinstall rear wheel with 55mm reverse threaded wheel nut at 22-240Nm
Please note there are alternate methods of bleeding a brake system such as that offered by Mighty Vac and others. On motorcycles I happen to prefer to use the master cylinder itself to bleed as the reservoirs on motorcycles are so small it is easy to overcome the new fluid supply and accidentally suck air into the system. There are some advantages to these systems however, in that their pressure may overcome bubbles in the system which can remain embedded by simple master cylinder pressure. Most users prefer to stay below 12psi / .83 bar so as not to damage seals in the system.
The use of these systems is fairly universal, you attach the extraction tube to the caliper bleed nipple, either pump up pressure or turn on compressor, and then release the valve which sucks the old fluid into the system's extraction container.
If you are interested in these systems see below:
Mighty Vac can be found at most automotive repair supply shops. It is the hand pump type and has only a small extraction reservoir:

Another vendor who offers a few types of bleed systems is Griots Garage in the USA
www.griotsgarage.com
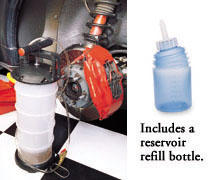
The following unit is a hand pump type and has a very large extraction reservoir (can also be used to extract oil from the sump, for example):
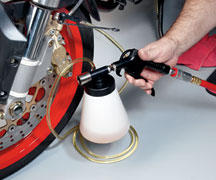
The following unit is a compressor type whereby you connect the unit to the air hose and only have to use the release valve trigger to begin extraction, it has a middle sized extraction reservoir:
-JamesC
posted by MV FAQ @ 10:36 AM
1 Comments
![]()

1 Comments:
I use a longer than usual length of clear tube and, once I'm sure that there is only fresh fluid in the system, I route this away from the waste bottle and up to the relocated reservoir.
This way, you can just keep on pumping away to your heart's content (smoke 'em if you've got 'em!) until you're absolutely certain that there is absolutely no air remaining without wasting two pints of fresh fluid.
Something I've also started to do in the last couple of months is to hang a weight off the pedal whenever the bike's in the garage.
Once you have a working rear brake and get the pads/disc properly bedded in, it really is responsive and usefull.
Senna 026
Post a Comment
Subscribe to Post Comments [Atom]
<< Home