Valentine 1 radar detector installation
Provided by Jerry Finley
http://piratesk12site.net/MVV1.htm
How anyone can ride a high performance motorcycle without a radar detector is beyond my comprehension...I can't ride 10 minutes without getting nailed with a "velocity award.".. Never fails. First thing I do when I purchase any motorcycle is figure in the cost of either the Passport 8500 or the Valentine One.. Depending on who you talk to, either is arguably the best money can buy. I run the Passport 8500 on my K12RS, but it simply didn't fit right on the MV so I paid the bucks and bought a new V1 for this install. FYI.. I have installed over 100 detectors over the years and 100% of them involved in-helmet speakers which involves lots of clever wiring. On the MV I took a different route.. With the exception of the power wire and ground for the V1... I went wireless using the H.A.R.D which is ...Inside Helmet Visual Alert - Instead of a blaring speaker, H.A.R.D. provides an immediate visual alert: a flashing LED light , inside the helmet that is illuminated within your field of vision allowing immediate recognition of radar. The H.A.R.D. consists of two miniature devices. A transmitter that broadcasts to a receiver within the helmet. Here is a step-by step of what I've done on my MV....
Parts/Materials Needed:
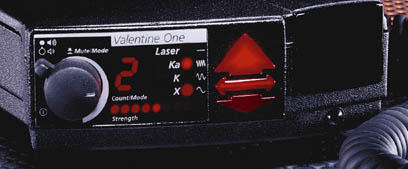
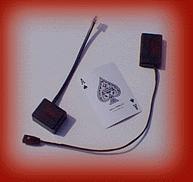
(1) Valentine One Radar Detector from http://www.valentineone.com/ (US $399)
(1) H.A.R.D. from http://www.legalspeeding.com/ (About US $160)
(1) Some hex wrenches / vise grips
(1) various wire splicing tools/crimpers/wire tires/electric tape
(1) heavy duty Velcro
(1) J B Weld or sodering gun
(1) 1 Six pack (Imported beer)
Wiring: Hot WireThis is a relatively easy install once you find out a good hot wire and ground... so you can benefit from my torment. FYI..both the furnished manual and the $100 shop manual are useless as tit's on a boar for determining wire color codes on this bike.. It's as if it was written by Stevie Wonder and edited by Ray Charles. I had to take my F4 to a local legend and BMW Jedi Knight to let him peruse the wiring. He deciphered the Matrix code and showed me a good place to run the hot wire and suggested a couple of places for a ground. As per the prophecy.. his advice was dead on...
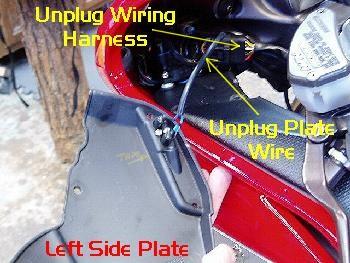
1. Loosen (but do not remove) the (2) screws securing the left side rear view mirror post then remove the (4) screws securing the left side plate to expose wiring harness (see pic at right).
2. After the 4 screws have been removed do NOT try to yank the plate off as one small wiring harness is attached underneath. This plate does NOT come out easily. It must be coaxed a little. Unplug the single wire harness fastened to the underside and set plate aside.
3. Unplug the large wire harness. You may have to slice the plastic coating back a little to access the wire. The hot wire I used on my 2003 is the Red wire with Green stripe. This is a switched wire meaning that when your key is off.. the power is off. I did a dry run to see how much actual V1 wire I needed then using one of the finished wire clips, I spliced directly into this hot wire.
Wiring: Ground
The hot wire was the easy part.. the ground proved to be a pain in the ass. There's really nothing easily accessible. You may have better luck. I chose to run the ground wire off the V1 to the metal clip that secures the headlight housing as shown in this pic...

1. I removed the clip and using J B Weld (a mixable liquid weld) secured the ground wire directly to the clip.
2. I waited about 4 hours for the J B to dry then reinstalled.
3. As to make sure the area of contact remains in top shape I placed a dab of liquid rubber electrical sealant over the entire area. It forms a waterproof barrier as well as secures the wire even better. This stuff can be purchased at Home Depot or Lowes for about $5 and is simply a liquid equivalent of electrical tape or shrink tubing. It dries in 5 minutes. Comes in 4 or 5 colors.
Hiding Wires: / V1 Install
The word here is anal....Routing the wires in a "clean" fashion has it's own rewards so take your time.. Try to have your new extra wiring as tucked in as possible before you replace the metal side plate. It's a tight fit any way you look at it and with all your new wire under there.. it's even tougher...
1. Replace the plate and (4) screws. Make sure the metal fairing post that holds the rear view mirror is positioned properly over the plate before tightening the (2) upper screws. If this post is NOT positioned properly with the two tits slotting into the 2 holes in the plate, your left front blinker will NOT work. The only thing you should have sticking out when done is the telephone type wire that powers the V1 and the ground wire.You should have about 8-10" length for both.
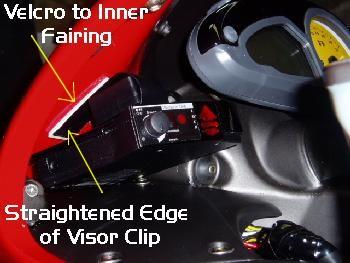
2. OK..Where to install the V1? A dilemma.. or is it? Here's my solution. Pay attention. The V1 comes with a sunviser clip. What I did was bend the very end of this clip flat using some vise grips. The sunviser clip now has a flat edge.
3. Take a little sand paper and smooth out the textured surface of the viser clip. Clean it off well.
4. The inside of the fairing on the left side has a perfect spot to secure this visor clip. (see pic at right) In the pic shown I used some white Velcro for test and positioning purposes. Make sure when positioning you check your lock-to-lock to make sure your bars clear the V1. Mine had about 1/2" clearance when done. I have since added some black industrial strength Velcro and it's holding solid as a rock. The best part is, I can simply slide the V1 out of the clip and unplug in a matter of seconds and it looks like it belongs here.
H.A.R.D. Install:
The HARD unit is a simple two piece system. The lower end consists of a tiny 3/4"x1" box with a phone type wire coming out of it. The upper is a small box with a flexible wire (with RED LED on the end) and an on/off switch. The way it works is this...
1. Plug the V1 phone type power wire (that is sticking out from underneath your metal side plate) into the side of the HARD.
2. Plug the HARD into the side of the V1... I stuck the little HARD transmitter inside the opening of the V1 visor clip. Perfect!
3. Place the receiver either inside your helmet under some padding.. neck-roll or ear opening (or stick on the outside of your helmet for easy access.) Keep in mind.. the HARD receiver is NOT waterproof.
4. Run the flexible wire with the RED LED light to where you can see it with your peripheral vision. A little trial and error is necessary to find the proper spot. I chose the Janet Jackson method of coming up from the bottom like a microphone. That's it.
Notes of Importance: Yes.. Ideally the V1 should be exposed for best reception of evil radar/laser waves. I chose a cleaner.. hidden-from-view method of install just so I wouldn't fuck up the visual beauty of the bike. A trade off, perhaps but, IMHO.. clean is good. BTW. Reception seems to be almost as good as if it weren't shooting through fiberglass.. Surprisingly, the V1's face is clearly in view and a quick glance offers easy view of the arrows showing were the "bad guys" are... Cool!
Also: There is a downside of the H.A.R.D. The receiving unit (on your helmet) must be switched on when in use.. and OFF when you get off the bike. Other people I spoke to confessed they regularly forgot to turn the unit off after their ride which means over night the two furnished watch-type batteries will go dead.. Sure enough.. after my first test ride.. I forgot. Next day.. TWO dead batteries. With my pathetic memory I think I'll be buying a dozen at a time... Another job well done, me thinks...Next time you ride.. you're on a quasi-level playing field with the blue meanies.... For now...Ride fast.. brake hard.....

Visit Jerry's site including additional how-to's and parts for sale at:
http://piratesk12site.net/MVIntro.htm
posted by MV FAQ @ 1:05 PM
2 Comments
![]()

2 Comments:
I found the ground connection unreliable. I ended up bringing a wire up front directly from the battery.
And I LOVE the techmount for a radar unit.
http://www.techmounts.com/products/index.php?page_function=detail&product_id=123
I found the ground connection unreliable. I ended up bringing a wire up front directly from the battery.
And I LOVE the techmount for a radar unit.
http://www.techmounts.com/products/index.php?page_function=detail&product_id=123
Post a Comment
Subscribe to Post Comments [Atom]
<< Home