Bearings, Rear Wheel Refurbishing and Info
Problems have occurred with the rear wheel bearings which are part of the rear hub assembly. This could result in a damaged hub housing, swing arm, or even a rear wheel lock-up!

There are three main reasons why this can happen:
1. Over-torquing the rear swing arm bolts
2. Under-torquing the rear swing arm bolts
3. Premature wearing of the bearings due to water entering the rear bearing (high-pressure cleaning)
The parts that can be ordered for repair go as far as the complete hub assembly including bearings. Instead, we have worked out a way to refurbish the hub, replacing only the bearings and seals, which results in lower repair costs and/or more frequent maintenance possibility. We are assuming there is no damage caused by bearing failure to the actual hub housing, check this thoroughly! When the hub has been damaged, renew the hub completely.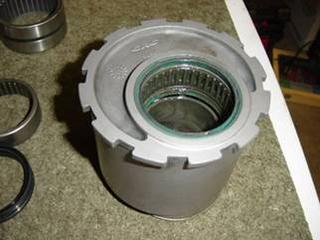 Image 1: Original hub with old bearings. Notice the ring between the two bearings just under the needle bearing seal.
MV Agusta advises renewing the hub at least every 36.000 km or 22.000 miles. The examples you will see are from an 2001 F4 1+1 having 35.000 km on the clock, where we discovered that although there was no major problem yet noticeable, one of the bearings was almost breaking down and was obviously overheated at some point. So MV’s instruction is correct (as expected!) although if you have any doubt that your hub has been improperly torqued or has seen excessive moisture due to pressure washing, etc…then it is recommended that you shorten MV’s advice and inspect at a reduced interval.
 Image 2: Overheated old double row bearing after 35.000 Km
Parts needed for refurbishing:
1. One bearing 3810 2RS - this is a closed and sealed double row angular contact ball bearing capable to withstand axial and radial forces. (65mm O.D. x 50mm I.D. x 12mm width)
2. One bearing HK5520 - this is a needle bearing for radial forces only.
3. Two seals MBR55X63X5A - applied to both sides of the needle bearing.
4. High quality bearing grease (must be able to withstand 190 degrees Celsius)
5. Bench-vice and aluminium plates to avoid direct contact of the bench-vice and hub or bearings.
Both bearings and seals are manufactured by INA and can be ordered as a set for approx. 50 British Pounds or 100 US Dollars at:
For the UK:
BSL Wolverhampton
Headway road, Wolverhampton.
Tel 01902 395959
Fax 01902 395939
(Thanks to the MV Agusta Owners Club UK)
For the US:
Through INA directly using your local bearing distributor.
For Australia:
NACHI Bearings
TLA-5520 Needle roller bearing
3810-2RS Double Row A/C Bearing
OS-55635 Oil Seal (need 2 of these)
1. Over-torquing the rear swing arm bolts
The swing arm is constructed in such a way that only the right torque (28 - 32 Newton Meters) will result in a perfect circle fitting of the hub into the swing arm, over-torquing will cause the circle to be oval and therefore create uneven pressure towards the hub causing the bearings to fail prematurely. Make sure torquing of the rear bolts is done properly and evenly by tightening each bolt, alternating as you go, until the desired value is obtained. One can check on a medium or long trip the temperature of the swing arm. Directly after stopping the swing arm should not be warmer then 50 to 60 Celsius.
 Image 3: Empty swing arm - make sure to clean thoroughly before assembly.
Overheating will be a direct result of a failing bearing. A failed bearing can also be noticed by a non-smooth or bumpy/noisy rear wheel movement when turning the rear wheel on the paddock stand. Noticing aluminum particles around the hub or even rim is reason to order a complete new hub as it will be damaged beyond repair! By experience, the 3810 2RS bearing is the worrying one, and when broken, heavy vibrations at the back of the F4 while driving are to be noticed clearly.
2. Under-torquing the rear swing arm bolts
This will cause the hub to turn in the swing arm which will cause damage to the swing arm and/or hub and also cause the chain tension to vary (eccentric). A very dangerous situation!
3. High pressure cleaning
Although one of the bearings is a closed sealed bearing (3810 2RS), we found rust inside due to earlier pressurized cleaning. Pressure cleaning is in all cases to be avoided anywhere on the F4 or Brutale (or any bike)!
 Image 4: Notice the rust marks at the lower roller position.
Disassembly:
Once the hub has been taken from the swing arm (for details consult the workshop manual) the sealed bearing can easily be removed by applying even pressure from the inside out using a small hammer and wood while securing the hub in a workbench and gently hammering the bearing out of the hub. No shrinking by cooling the hub is needed for both disassembly and assembly. Notice that the present seals (2) of the open bearing will be damaged beyond repair and will warrant replacement anyway. Inside the hub there is a pressure ring which can be taken out after removal of the sealed bearing. This will make the open bearing accessible from the inside and then it can be removed the same way as the closed bearing.
 Image 5: Inner ring between bearing 1 and 2
After removing the bearings inspect to see if they have been overheated. This can be seen by the color of the closed bearing inner ring, brown or blue will be marks of overheating (see image 2). Thoroughly clean the inside and outside of the hub with degreaser and check for any damage of the hub housing.
Assembly open bearing HK5520:
First assemble the open bearing by fitting one of the seals (MBR55X63X5A), followed by fitting the new open needle bearing (HK5520).
 Image 6: Position the needle bearing.
Then use a bench-vice with aluminium protection plates on either side to gently press the bearing in its place.
 Image 7: Press in place.
After the open bearing is positioned, fit the second seal, this seal will fit until the topside is even with the hub housing. The placement of the seal should not be done with a bench-vice but manually. After fitting both seals and bearing make sure to grease the bearing sufficient with high quality bearing grease.
 Image 8: Lock the bearing with inner clip to secure.
Grease the bearing properly with high quality grease. Use grease which can withstand 190 degrees Celsius. When in place, there should be almost no space between the inner ring and both bearings, causing the inner ring to offload axial forces during operational use. Image 9: fitted needle bearing and seals.
Note: Inner Race for the needle roller bearing.
This is a loose part and may need replacing, mine was actually loc-tightened to the spindle and took 30t of force to remove. I asked MV if I could buy the inner race separately, no please pay AU$1280 for the whole hub. Well AU$9.00 later and part number LRT-505535 and the problem was solved. (courtesy of mv_ozzie)
Assembly closed bearing 3810 2RS:
Make sure the inner ring is placed into the hub before assembling the closed bearing 3810 2RS! Clean the hub thoroughly before placing the bearing in its place, this will assure easy fitting. Here we need no seals; this bearing is a closed bearing. First place the inner ring towards the open bearing inside the hub. Then evenly place the closed bearing in its housing. The original bearing is placed with the part number pointing to the inner part of the hub. We have placed the new bearing accordingly, but it should make no difference. Use again aluminum plates and a bench-vice and gently press the bearing into the hub. When properly cleaned and placed there will be almost no force needed to place the bearing, a bench-vice is only used to evenly press the bearing in its place.
 Image 10: pressing the closed bearing into the hub.
When in position, no grease is needed. The top of the bearing will be even with the top of the hub when in position.
Well, job done! All you have to do now is assemble the hub into the swing arm and after assembling the axel etc. (see workshop manual) make sure to torque your swing arm bolts as described earlier. Enjoy your MV Agusta knowing your bearings won’t fail!
Harm Meijer en John Bex
www.bikemotel.nl
posted by MV FAQ @ 12:03 PM
0 Comments
![]()

0 Comments:
Post a Comment
Subscribe to Post Comments [Atom]
<< Home